"We Speak Mac"
![]()
Internet Services
Home ||| WebMail Login ||| Hosting ||| Lessons & Support ||| Email Settings ||| Contact
Here are the settings needed to access our new mail server. Please read through these directions before starting so you will
know what you need to do. Pick up your email using the old settings before making any changes - then follow these instructions. Changes are: Mac Mail Set Up |
|
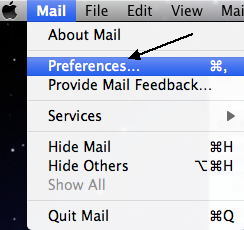 |
Under the Mail menu - click on Preferences. This opens the preference panel shown in the next image.
|
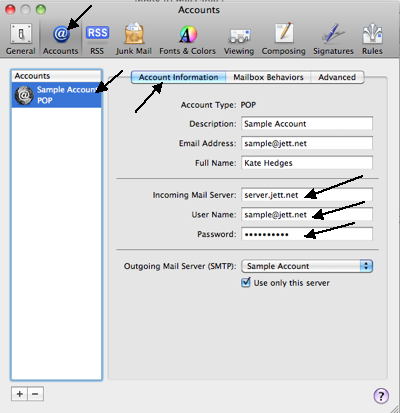 |
CLICK on the Accounts icon at the top. HIGHLIGHT the account you want to work with in the left hand column. CLICK the Account Information tab. CHANGE the incoming mail server to server.jett.net CHANGE the user name to your email address CHANGE the password to the one sent to you by email.
|
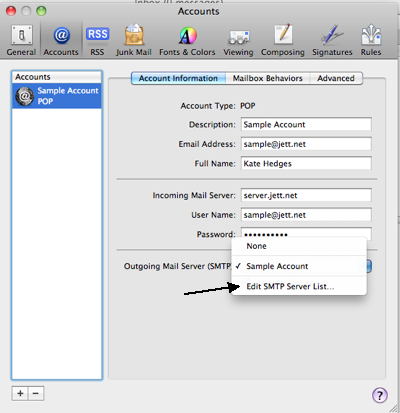 |
Click on the Outgoing Mail Server dropdown menu. SELECT Edit SMTP Server List This will open another window. |
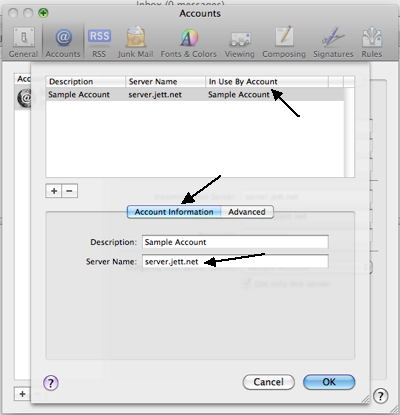 |
Check that the accout you are working with is highlighted. CLICK the Account Information tab. CHANGE the Server Name to server.jett.net
DO NOT clcik OK yet. |
 |
CLICK on the Advanced tab. SELECT Use default ports (25, 465, 587) CHECK the box by Use Secure Sockets Layer (SSL) In the Authentication dropdown menu SELECT MD5 Challenge-Response CHANGE the User Name is your email address CHANGE the password to the one sent to you by email. CLICK on OK. This will close the smaller window. |
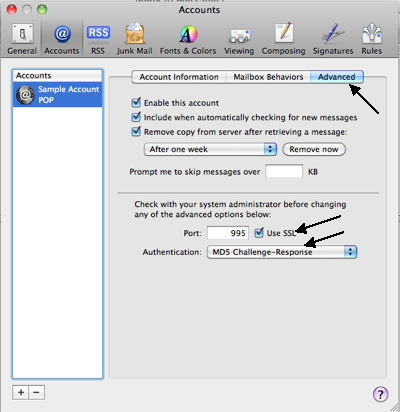 |
SELECT the Advanced tab. At the bottom, CHECK the box by Use SSL. This will cause the port number to change to 995 automatically. In the Authentication dropdown menu SELECT MD5 Challenge-Response Close the preference pane and SAVE the changes. TEST the settings by sending yourself an email. If you can both send and receive you have everything right. |
|
|
Email Set Up for Outlook Express Pick up your email using the old settings before making any changes - then follow these instructions. Changes are: |
|
 |
In Outlook Express, when you click on the Outlook Express icon above the local folders the account settings panel will show. Click on set up new email account. |
 |
This opens the first panel where you enter a friendly name for this account. You can use your email address if you wish or call the account "home" or "work". Click Next. |
 |
Enter your email address. Click Next. |
 |
The incoming mail server is a POP3 server. The incoming server is server.jett.net The outgoing server is server.jett.net Click Next. |
 |
Your internet mail logon is your email address. CHANGE the password to the one sent to you by email. Click Next. |
 |
Congratulations, you are almost done. Click Finish. |
 |
The Internet Accounts panel will be open. Highlight the account you just created. Click on Properties. |
 |
Under the General Tab should be your friendly name, your name and your email address. If you want people to reply to a different address - enter it here in the reply address field. Check the box to include this account when checking for new mail. Click OK. |
 |
Click the Advanced Tab.
Under Server Port Numbers, change the Outgoing mail (SMTP) to 465. CHECK the box by This server requires a secure connection (SSL) for the Outgoing mail server. Change the Incoming mail (POP) port number to 995 CHECK the box by This server requires a secure connection (SSL) for the Incoming mail server. Click OK. Your account is ready to go. Close all windows. TEST the settings by sending yourself an email. If you can both send and receive you have everything right. |